Apache Kafka Basic
Written By Nuri Na, VCANUS
Overview
Apache Kafka는 오픈소스 데이터 스트림 플랫폼으로, 대용량 실시간 로그 처리에 특화된 메시징 시스템이다.
메시지를 메모리가 아닌 파일 시스템에 저장하며, 분산형 시스템으로 노드 고장과 데이터 손실에 대비한다.
consumer가 broker로부터 직접 메시지를 가지고 가는 pull 방식으로 동작, 자신의 처리 능력만큼만 가져가게 된다.
Concepts
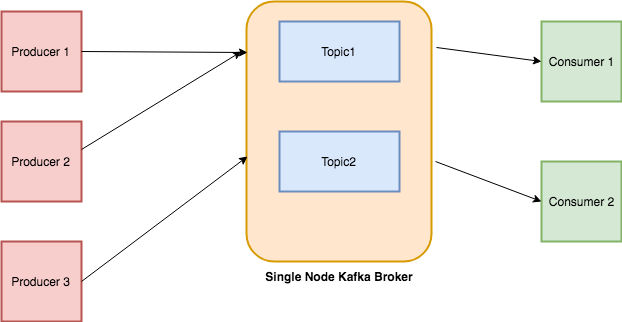
이미지 출처 : https://towardsdatascience.com/getting-started-with-apache-kafka-in-python-604b3250aa05

이미지 출처 : https://kafka.apache.org/intro
- Producers : 메세지 생산(발행: publish)을 담당. 토픽을 선택하여 데이터를 발행한다.
-
Consumers : 토픽을 선택 구독하여 데이터를 소비한다.
-
Broker : 메세지 교환을 담당하는 모든 요소. Kafka는 싱글노드 혹은 클러스터로 구성할 수 있다.
-
Topic
-
Log : 한 개의 메세지
- Offset : 파티션 내에서 각 메세지가 가지는 Unique Id
Zookeeper
분산코디네이터. 브로커를 모니터링하고, 토픽, 파티션을 관리한다.
Basic Tutorials
Setting up and Running
Apache Kafka website 에서 바이너리 파일을 다운로드
JVM언어를 기반으로 하므로 Java 7 이상 버전이 필요함
Starting Zookeeper
Kafka는 Zookeeper에 의존하므로 Zookeeper를 먼저 구동한다.
Kafka 설치 디렉토리를 ${KAFKA_PATH}로 통일하여 기술함
${KAFKA_PATH}/bin/zookeeper-server-start.sh config/zookeeper.properties
Starting Kafka
Kafka 브로커 서버를 구동한다.
${KAFKA_PATH}/bin/kafka-server-start.sh config/server.properties
Create Topics
메세지는 토픽에 전달된다. 다음 명령어는 test라는 토픽을 생성한다.
${KAFKA_PATH}/bin/kafka-topics.sh --create --zookeeper localhost:2181 --replication-factor 1 --partitions 1 --topic test
다음 명령어로 생성된 토픽의 전체 목록을 확인
${KAFKA_PATH}/bin/kafka-topics.sh --list --zookeeper localhost:2181
Delete Topics
${KAFKA_PATH}/kafka-topics.sh --delete --zookeeper localhost:2181 --replication-factor 1 --partition 1 --topic test
Sending Messages
producer는 토픽에 메세지를 전송한다.
${KAFKA_PATH}/bin/kafka-console-producer.sh --broker-list localhost:9092 --topic test
>Hello World
${KAFKA_PATH}/config/server.properties 설정파일 listeners 에 9092포트가 기본으로 설정되어 있다. 해당 브로커의 test 토픽으로 메세지가 전송된다.
보낸 메세지는 로컬 디스크에 저장된다. 설정파일 log.dirs에서 경로를 설정한다. 저장된 메세지는 소비되면서 사라지는 것이 아니라 log.retintion.hours 에서 설정한 시간 만큼 유지된다.
Consuming Messages
정해진 topic 에 producer 가 메세지를 발행해놓으면 consumer 가 필요할때 해당 메세지를 가져간다.
# 해당 토픽에 저장된 메세지 모두 가져오기
${KAFKA_PATH}/bin/kafka-console-consumer.sh --bootstrap-server localhost:9092 --topic test --from-beginning
--from-beginning 을 제거하면 실시간 발생되는 메세지를 받아온다.
Accessing Kafka in Python
RTSP 프로토콜로 영상을 받아 openCV로 렌더링, flask 웹서버를 이용해 영상을 띄우는 예제
Setting up libraries
-
파이썬 버추얼 환경을 설정(virtualenv 참고)한다.
virtualenv env . env/bin/activate -
파이썬에 필요한 라이브러리를 설치한다. 카프카, OpneCV, Flask.
pip install kafka-python opencv-contrib-python Flask
producer.py
Producer는 RTSP 스트리밍 데이터를 카프카 서버에 발행한다.
import sys
import time
import cv2
from kafka import KafkaProducer

topic = "rtsp-stream"

def publish_camera():
    """
    특정한 토픽에 비디오 스트림을 발행한다. 카프카 서버는 localhost:9092
    """

    # Producer를 설정한다
    producer = KafkaProducer(bootstrap_servers='localhost:9092')

    gst = "rtsp://서버 ip 주소" # 예) rtsp://192.168.0.108:8554/test
    cap = cv2.VideoCapture(gst)

    try:
        while(True):
            success, frame = cap.read()

            ret, buffer = cv2.imencode('.jpeg', frame) #buffer에 이미지를 받아
            producer.send(topic, buffer.tobytes()) #설정한 producer의 해당 토픽으로 send

    except:
        print("\nExiting.")
        sys.exit(1)

    cap.release()


if __name__ == '__main__':
    """
    Producer는 rtsp 스트리밍 데이터를 카프카 서버에 발행한다.
    """
    print("publihing feed!")
    publish_camera()
consumer.py
import datetime
from flask import Flask, Response, render_template
from kafka import KafkaConsumer

# Kafka Consumer 작동
topic = "rtsp-stream"

consumer = KafkaConsumer(
    topic,
    bootstrap_servers=['localhost:9092'])


# Set the consumer in a Flask App
app = Flask(__name__)

@app.route('/video_feed', methods=['GET']) # /video_feed로 페이지 접속
def video_feed():
    """
    mimetype으로 multipart/x-mixed-replace를 설정
    Flask에서 파이프라인으로 들어오는 새 value가 기존 이미지를 대체
    (화면의 이미지가 새 이미지로 지속적으로 업데이트)
    """
    return Response(
        get_video_stream(),
        mimetype='multipart/x-mixed-replace; boundary=frame')

def get_video_stream():
    """
    카프카 서버에서 스트리밍되는 이미지를 받아 Flask가 읽을 수 있는 포맷으로 변경
    """
    for msg in consumer:
        yield (b'--frame\r\n'
               b'Content-Type: image/jpeg\r\n\r\n' + msg.value + b'\r\n\r\n')

if __name__ == "__main__":
    app.run(host='0.0.0.0', debug=True)
Run
-
Zookeeper와 Kafka 서버를 구동한다. (Basic Tutorials 참고)
-
파이썬 버추얼 환경 설정 후 consumer.py를 실행한다
. env/bin/activate python consumer.py -
https://0.0.0.0:5000/video_feed 접속
클라이언트는 설정한 토픽으로부터 데이터 스트림을 받아오지만, 토픽은 아직 비어있으므로 아무것도 뜨지 않는다.
-
새로운 터미널에서 producer.py를 실행한다.
. env/bin/activate
python producer.py
토픽에 데이터가 발행됨에 따라 https://0.0.0.0:5000/video_feed 에서도 구독한 토픽의 데이터를 가져오고, 스트리밍 영상이 재생된다.
Leave a comment